The 1791ES-IB8XOBV4 on the palletiser cell failed on a Sunday, the spare from stores has the same catalogue number and the same three address switches set to 21, and the yellow triangle over it in the I/O tree has not moved in forty minutes. The GuardLogix 5580 project has a safety signature, the module’s Safety tab says the configuration owner is a controller with a safety network number nobody recognises, and the only advice so far has been to download the project again. Do not. The controller has the module’s configuration and would happily send it; what it will not do while a safety signature exists is give a strange module an identity, and that identity – the safety network number plus the node address – is the thing the spare arrived without. Everything below is the GuardLogix safety reference manual and the Guard I/O and GuardLogix 5580 user manuals, read this week, with the ET 200SP equivalent at the end because the same swap goes differently there.
Four things have to match: the node address, the electronic keying, the SNN, and the configuration signature. The spare has one of them.
What the safety network number is, and why the controller cannot just assume it
A CIP Safety device is not identified by its IP address. It is identified by a unique node reference, which the safety reference manual builds from two parts: the safety network number of the subnet the device sits on, and the device’s node address on that subnet.
The SNN is assigned per subnet, not per device. A ControlLogix backplane is one subnet and its node addresses are slot numbers; an EtherNet/IP network is another and its node addresses are IP addresses; a GuardLogix 5580 therefore has two SNNs, one for the backplane and one for the Ethernet port, and the user manual notes that a controller in Dual-IP mode connected to two networks must not give them the same SNN because a switch could route packets between them. Logix Designer generates a time-based SNN automatically the first time a subnet with a CIP Safety device appears in the project, and for a single controller project that is enough; the manual says to assign SNNs manually only when several controllers share safety I/O or the same subnet, and it has copy and paste on the Safety tab for that. The point of all this is the reason a spare cannot be trusted by default: the protocol has to prove that the module answering at 192.168.10.21 is the module the safety task was validated against, and not a second device on a bridged network that happens to have the same address. A module out of the box has no SNN. The manual’s phrase for it is out-of-box condition, and it is the state a spare should be in, which is why both manuals tell you to reset a previously used module to out-of-box before it goes into stores.
The address on the switches is the node. The SNN is the network. The module needs both before the controller will open a safety connection to it.
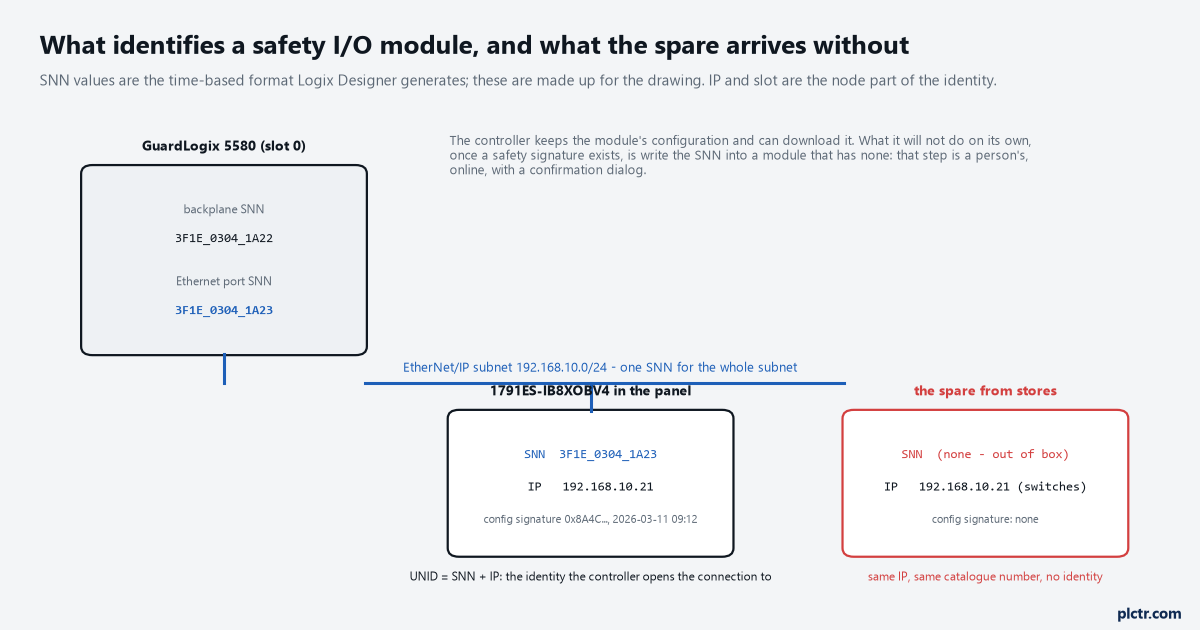
Same catalogue number, same IP, no identity. The controller will not invent one for it while a safety signature exists.
Two signatures, and they are not the same thing
The word signature is doing two jobs here, and half of the confusion on that Sunday was people meaning different ones.
The controller safety signature is the 64-character ID with a time stamp that covers the entire safety portion of the project, and the safety reference manual says operation at SIL 2 or SIL 3 requires it; it is generated once the application is validated and it is what a safety-locked project protects. The safety I/O configuration signature is per module: a signature ID for the module’s configuration plus the date and time it was last applied, and the controller compares the one it holds against the one in the module before it opens the connection. The Guard I/O manual lists what the ownership of a module depends on: the module’s IP address, the module’s SNN, the controller’s slot, the controller’s SNN, the path from one to the other, and the configuration signature – and if any of those changes the connection drops and the yellow triangle appears. A module that was configured in another project keeps the configuration signature from that project, which the reference manual names as a cause of a failed connection, and the cure is to reset ownership so the controller can download its own. Two things about the configuration signature are worth knowing before you touch it: online changes to the module configuration change the signature, and offline changes change the time stamp even if you put the values back, so after an offline edit you either upload to keep what is running or download to push what you changed. And the controller checks it for you. The reference manual says there is no requirement to monitor or document the configuration signature; that is the controller’s job, and the module goes to its safe state if it ever changes unexpectedly.
The project’s safety signature is the gate on automatic configuration. The module’s configuration signature is what gets downloaded once the gate is passed.
The two replacement options, and what the controller does under each
The Safety tab of Controller Properties has one setting that decides how a replacement goes, and both manuals describe it the same way.
With “Only Allow Automatic Configuration When No Safety Signature Exists” – the default, and the one to keep – the controller configures a replacement device by itself only when the safety task has no signature and the device is out of the box. Once a signature exists, it still configures the replacement automatically, but only if the device already has the correct SNN, the electronic keying matches, and the node or IP address is right; a spare from stores fails the first of those, and the manual procedure is the fix. Go online, open the module’s properties, click the browse button beside the safety network number on the General tab, click Set to write the controller’s SNN into the module, confirm that the network status LED is alternating red and green on the module you meant – that step is there so you cannot write the SNN into the wrong device on a shared network – and click Yes on the confirmation. Then, and the manual says it every time, functionally test the replaced device before the zone is relied on again. With “Always Allow Automatic Configuration” the controller writes the SNN itself into any out-of-box device whose node and keying match, and the attention under it in both manuals is unambiguous: select it only if the entire routable safety system is not being relied on for SIL 2 or SIL 3 during the replacement and its testing, because with it enabled any device left out-of-box on the network is a device the controller will claim. The reference manual gives the use cases: multi-zone systems where one zone is replaced while others stay in service want the first option; an isolated safety network with energy isolation during the swap can use the second.
The spare on the palletiser needed the Set button, once, from a laptop that was online. Not a download.
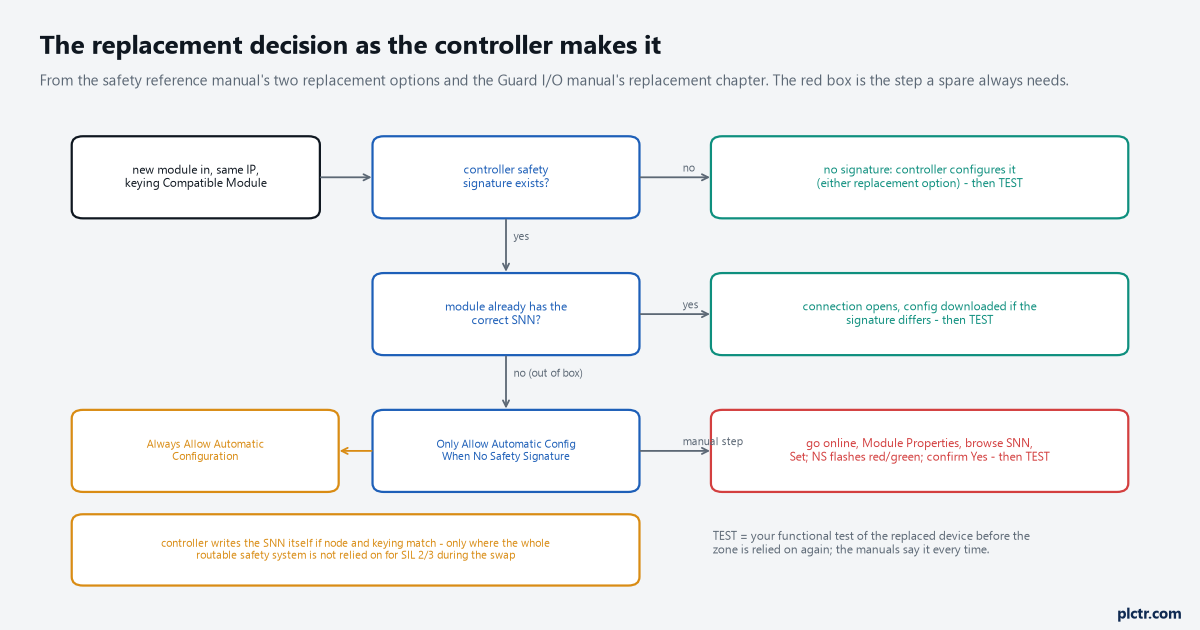
The red box is the step every spare from stores needs while a safety signature exists. The orange path is the option that skips it, and the condition on using it.
Reset ownership, and when the button is greyed out
A module that says Remote on its Safety tab belongs to somebody else, and the controller will not take it until that is cleared.
The user manual’s procedure is short: when the project is online, the Safety tab shows Local if this project owns the configuration, Remote with the owner’s SNN and node address if another device does, and a communication error if the read fails. If it shows Local you have to inhibit the connection first, on the Connection tab, then Reset Ownership on the Safety tab; if it shows Remote you reset ownership directly, and the module returns to out-of-box. Then the Set SNN step above, then the controller downloads the configuration and the yellow triangle goes. The 5580 user manual adds the three conditions under which Reset Ownership is not available: pending edits to the device properties, a safety signature present, or the project safety-locked. That last pair catches people at the worst time, because the machine with a signature is exactly the one being repaired on a Sunday. The order that works is to set the SNN into the out-of-box spare first – Set SNN does not need the signature removed – and to reserve Reset Ownership for a module that genuinely came from another project, where the signature question has to go through whoever owns the validation.
Set SNN with the signature in place. Reset Ownership only on a module with somebody else’s name on it.
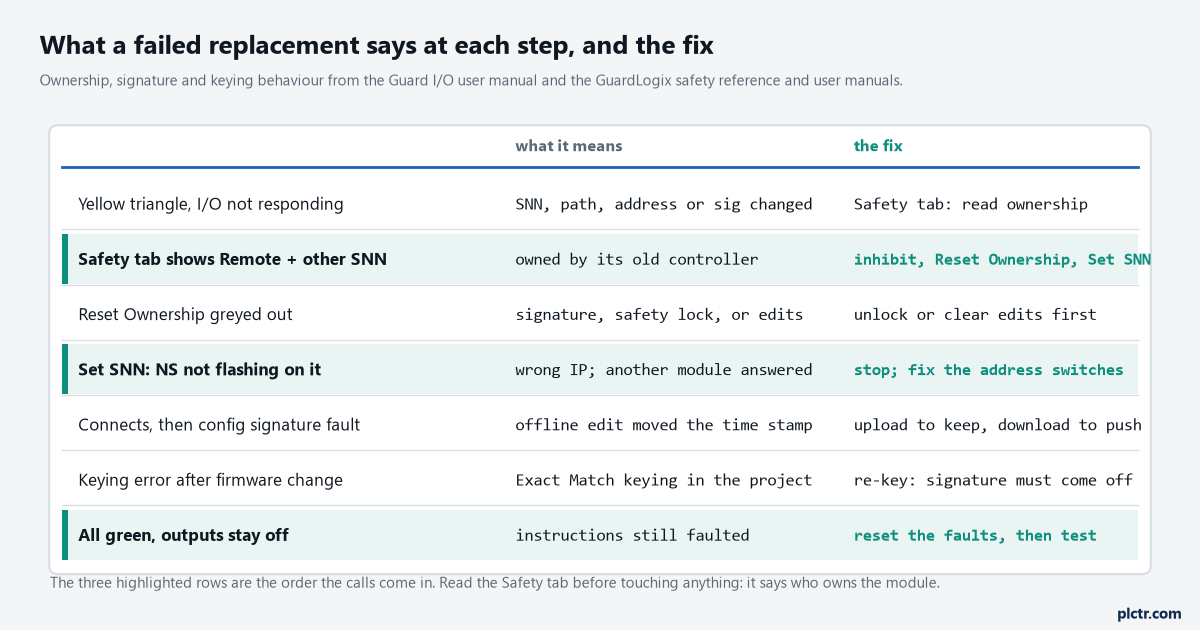
Read the Safety tab before touching anything. The highlighted rows are the order the calls come in.
Keying, and the firmware in the spare
The electronic keying setting decides whether the spare is acceptable at all, and it interacts with the safety signature in a way the reference manual spells out.
Compatible Module accepts a device with the same catalogue number and the same or higher major revision, with the minor revision rules the manual’s table gives, and to keep the safety signature the replacement must meet those. Exact Match requires every keying attribute to match, and if the spare’s firmware differs the keying in the project has to change – which the manual says cannot be done without removing the controller safety signature. Disable Keying is the option the manual says many safety devices do not offer and strongly recommends against for the rest. So on a validated machine with Exact Match keying, a spare with newer firmware is not a five-minute swap; it is a change to the safety project, with the validation that implies. The cross-vendor version of that problem is in spare CPU firmware mismatch, and the answer is the same in spirit: know the revision of what is in stores before you need it.
Compatible Module, and a spare at the same major revision, is what makes a Sunday swap a Sunday swap.
The same swap on ET 200SP
On the Siemens side the identity is the PROFIsafe address – F-source and F-destination – and the interesting part is where it is stored.
ET 200SP F-modules have no DIP switch; the address is assigned from TIA Portal and written into the F-coding element, and the SIMATIC Safety manual’s list of when it does not have to be assigned again includes replacement of the F-module for repair without a PG, replacement of the BaseUnit, and repair or replacement of the interface module. The coding element stays with the BaseUnit, so a spare F-DI pushed onto the same BaseUnit picks up the address at power-up and the F-CPU sees the same module it validated. The list of when it does have to be reassigned is short and specific: a module placed later at first commissioning, a deliberate change of address, a change of the CPU’s central F-source address, replacement of the coding element itself, and commissioning the next copy of a series machine. The collective F-signature of the safety program covers the configuration, not the serial number of the module in the slot, so nothing on the CPU side changes for a like-for-like swap. That is the design difference in one sentence: Rockwell puts the identity in the module and makes a person write it into the spare; Siemens puts it in the slot and the spare inherits it. Both have a reason. The Rockwell way survives a module being moved to another panel by mistake; the Siemens way survives a shift without a laptop. How the address gets there in the first place, and the rest of the F-DI’s properties, is configuring an ET 200SP F-DI in TIA Portal.
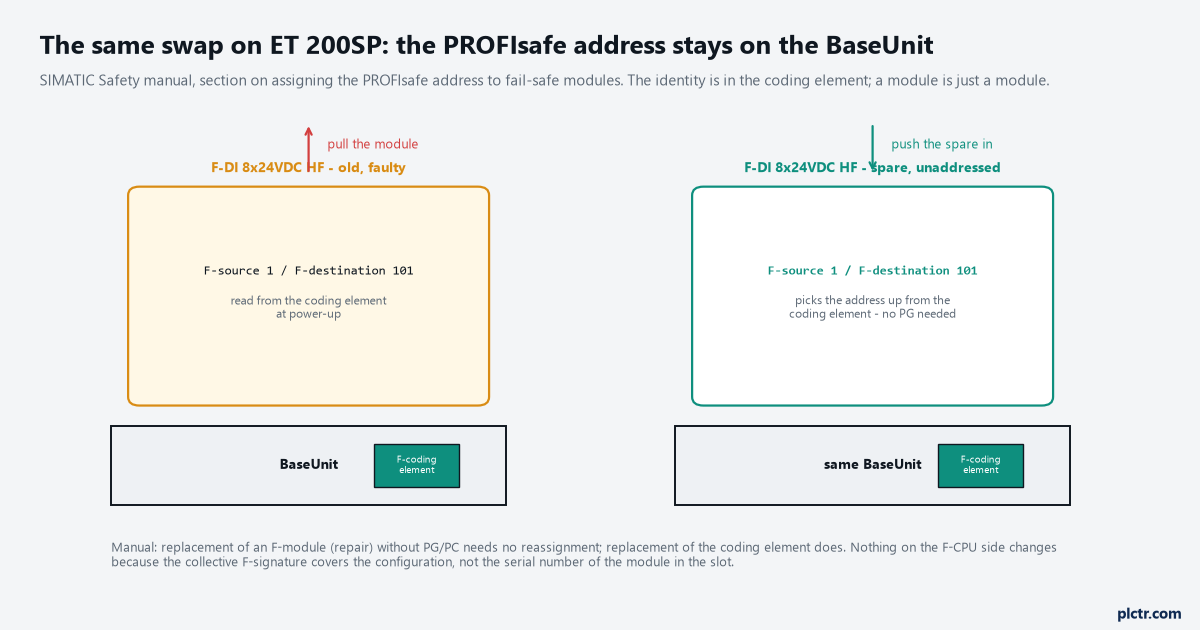
The address lives in the coding element on the BaseUnit. A module is just a module, and a spare BaseUnit with its own coding element is the case that needs the laptop.
Next step
Go online, open the module’s Safety tab, and read the ownership line before anything else; it tells you whether you have an out-of-box spare that needs Set SNN, or somebody else’s module that needs Reset Ownership first. Then check the controller’s replacement option on its own Safety tab and make sure it is the first one, and write the SNN and the keying setting on the drawing next to the module so the next Sunday is shorter. After the connection is up, the safety instructions still hold their faults from the swap: the DCS on the guard and the CROUT on the contactors want a reset, and that reset has to be an edge, which is the rising-edge reset article. A channel that comes back but reads zero on the Siemens side is a different mechanism, passivation, and it has its own article. And the last step is the one both manuals repeat: functionally test the replaced device before the zone is relied on again, and write down that you did.
The spare needs an identity, not a download. Give it the SNN, test it, and put the old one in stores reset to out-of-box.