A 5069-L320ER comes out of the box with no IP address, both Ethernet ports DHCP-enabled and firmware revision 1.xxx on it. Set the address first and then flash it to 29.011 or later, and the controller quietly moves itself into Dual-IP mode, applies the address you just typed to port A2 instead, throws away the DNS servers and the domain name, and leaves you to do the whole thing again.
Install the firmware first. Then set the addresses. That is the order, and it is the difference between one commissioning visit and two.
The rest of this is the tool itself — the seven clicks, the one everybody skips, and what the panel’s other devices do before the tool ever gets a look in.
The order, and what each one leaves you with
There are two ways round, and the manual prints both because the outcomes are not the same.
Take the controller out of the box, give port A1/A2 an address, and then install revision 29.011 or later, and here is what the manual says you get: the EtherNet/IP mode is set to Dual-IP automatically, the A1/A2 address, mask and default gateway are applied to port A2, other A1/A2 settings such as DNS servers and domain name are lost, the A1/A2 MAC address is applied to port A1 while port A2 gets a separate MAC, and you must set the IP address configuration again. Do it the other way — firmware, then addresses on A1 and on A2 — and the mode is already Dual-IP, each port already has its own MAC, and you set each port’s address once. The same trap catches a controller that is already in service: take a running 28.xxx up to 29.011 or later and the mode changes to Dual-IP, the old A1/A2 settings land on A2 and the DNS and domain entries go. Write down what is in the port configuration before an upgrade, because afterwards you will be reconstructing it from memory.
A controller in Dual-IP mode needs two addresses, not one. That surprises people the first time.
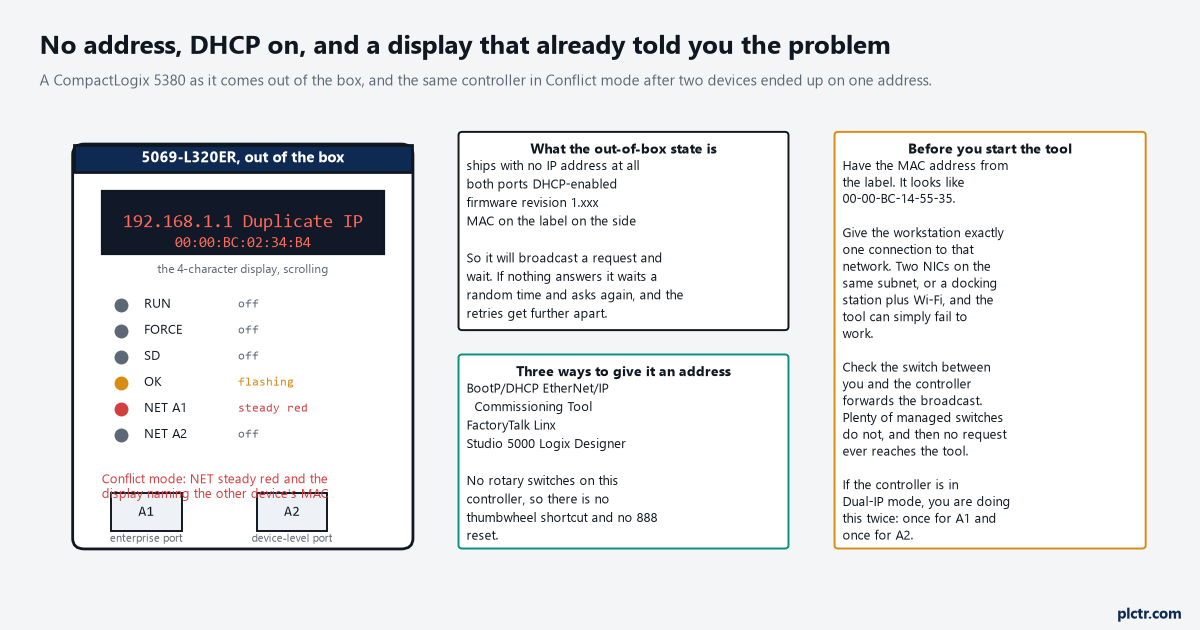
The display is doing the diagnostics for you. NET steady red and a scrolling address plus somebody else’s MAC is Conflict mode, not a missing address.
Before the tool will work at all
Two things have to be true, and neither of them is on the controller.
Your workstation needs exactly one connection to the EtherNet/IP network the device is on; the manual says the tool can fail to work if the workstation has multiple connections, and a docking station with a live wired port plus Wi-Fi on the same plant network counts. Turn the other one off. Second, the switch in between has to forward the broadcast, and the manual is blunt that many managed switches disable that capability, which produces the symptom where the Request History window stays empty forever and you start wondering whether the controller is dead. It is not dead. It is broadcasting into a switch that is dropping the broadcast, and the fix is either to plug into an unmanaged switch for five minutes or to connect the laptop directly to the controller’s port. Worth knowing too: after each unanswered request the device waits a random time and tries again, and the retries get further apart, so a controller that has been sitting there for twenty minutes is asking far less often than one you have just powered up. If you have been waiting a while with nothing appearing, cycle power on the controller and watch again.
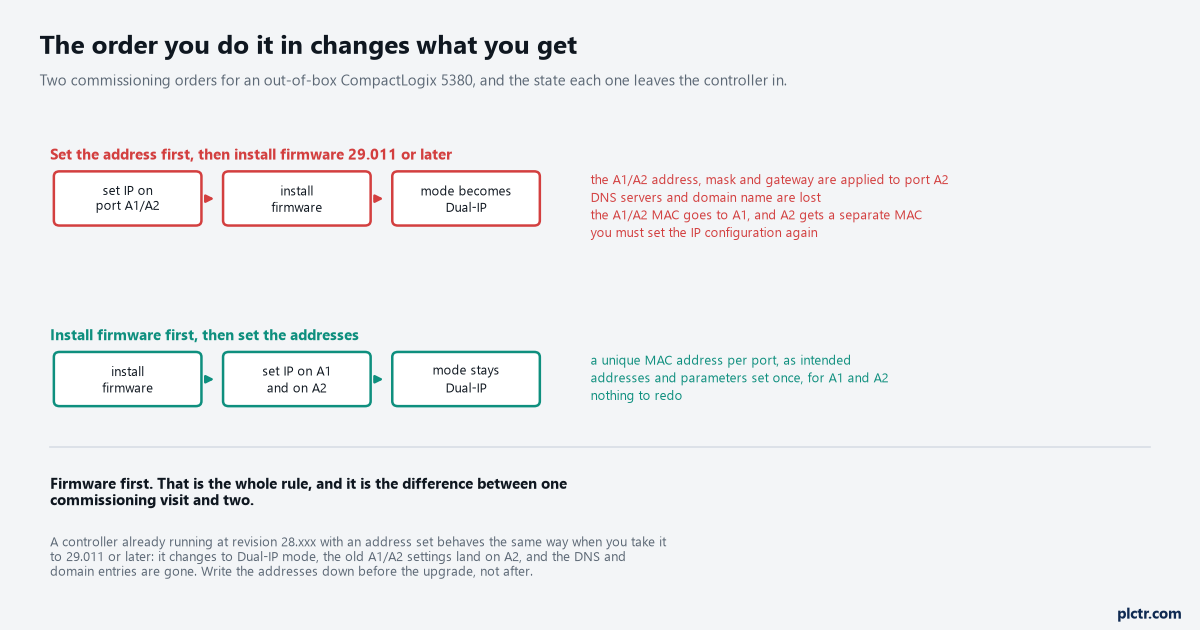
The top path is not broken, it is just longer by one round of configuration. The bottom one is the same work in a better order.
The seven steps, and the one that gets skipped
Six of them get you an address. The seventh is the one that keeps it.
Confirm the device is on the network, start the tool and watch the MAC appear in Request History, select it and click Add to Relation List, type the IP address — hostname and description are optional — and click OK. Wait for the device to appear in the Relation List panel, select it there, and click Disable BOOTP/DHCP. That last click is what turns the controller from a device that asks the network for an address every time it powers up into a device that uses the one you gave it. Miss it and the manual is explicit about the consequence: on future power cycles the current IP configuration is cleared and the controller sends DHCP requests again. So the machine runs beautifully all week, somebody pulls the main disconnect on Saturday, and Monday morning nothing can find the controller. Nothing was corrupted and nothing failed. The address was always temporary and you were never told.
If you click Disable BOOTP/DHCP and it does not take, RSLinx Classic will do the same job: right-click the device, choose Module Configuration, open the Port Configuration tab and select Manually configure IP settings.
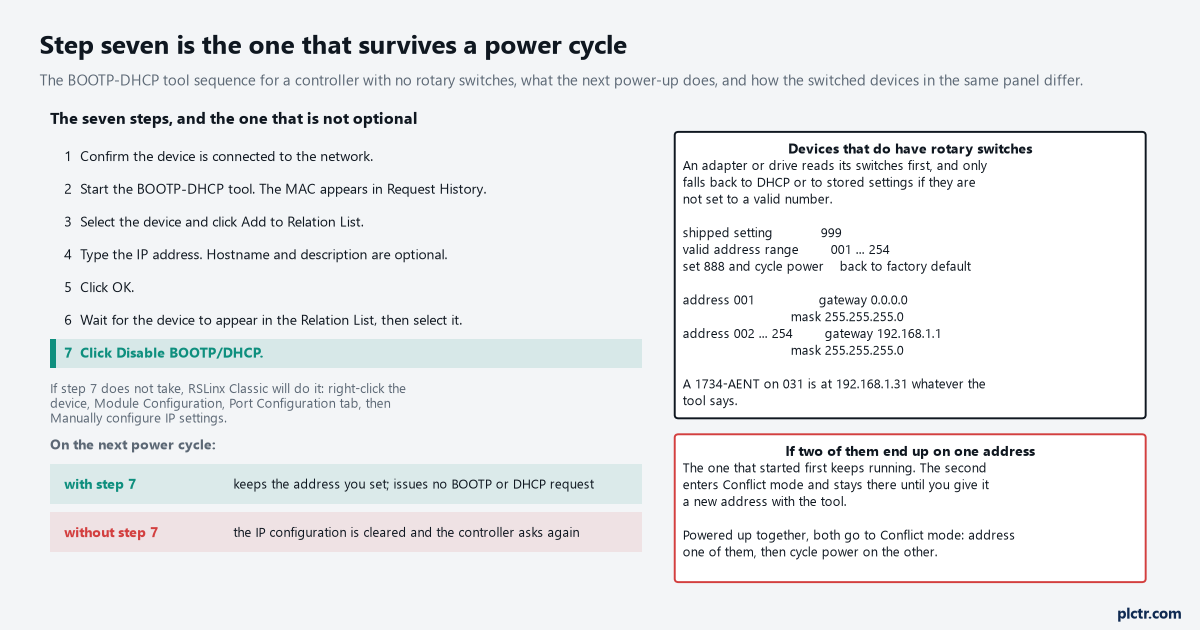
Steps one to six are the ones people remember. Step seven is the one that decides whether Monday works.
The devices that never asked the tool anything
The controller has no rotary switches. Half the panel does.
A 1734-AENT, a PowerFlex drive or a point I/O adapter with thumbwheels reads those switches first and only falls back to DHCP or to what is in nonvolatile memory if the switches are not set to a valid number. Valid is 001 through 254, and they ship on 999, which is deliberately invalid so that a new device out of the carton will ask the network. Set 031 and the device is at 192.168.1.31 with a 255.255.255.0 mask and a 192.168.1.1 gateway, and no amount of typing in the BOOTP tool will change that while the switches say 031. Address 001 is the odd one: it gives a gateway of 0.0.0.0 with the same mask. And if you ever need a device back to factory default, 888 and a power cycle does it. This is where a commissioning afternoon goes: somebody addresses an adapter in the tool, it comes up on a different address, and the switches on the side of the module have been sitting at a number since the panel shop.
Read the switches before you open the tool. It takes ten seconds and saves an hour.
Going back to one address
Dual-IP is two networks on one controller. Plenty of cells only want one.
Switching to Linear/DLR mode gives you a single address across both ports, which is what you want when A1 and A2 are two ends of a device-level ring rather than an enterprise port and a device port. It is not a free change and the manual fences it about. You cannot change from Dual-IP to Linear/DLR while you are connected through port A1 — you have to be on A2 to do it. The change only succeeds if the I/O configuration section of at least one of the two ports has no modules in it; with modules under both ports, the option is refused outright, so the tree has to be emptied on one side first. In Logix Designer the route is offline, Controller Properties, the General tab, Change IP Mode, then save and download and read the warning it puts up before you click Yes. From FactoryTalk Linx it is done online with no project in the controller, and the controller has to be in Program, Remote Program or Remote Run; Run mode will not have it. When the change goes through, the port A2 address, mask and gateway become the A1/A2 settings and the port A1 MAC becomes the A1/A2 MAC.
Decide the mode before the I/O tree is built. Undoing it later costs a download.
When two of them end up on the same address
The controller checks, which is more than some devices do.
It verifies its address against the network both when you connect it and when you change the address, and if it finds a match the port goes into Conflict mode: NET indicator steady red, and the four-character display scrolling the address, the words Duplicate IP, and the MAC address of the device it collided with. Which of the two devices ends up in Conflict mode depends on the timing. The one that started operating first keeps the address and carries on; the second one detects the duplication and stops. Power both up together and both go into Conflict mode, and the way out is to give one of them a new address with the tool and then cycle power on the other. The awkward case is a device that does not do duplicate address detection at all, because then it keeps running regardless of who was first and the Logix controller is the one that stops.
What to do next time you open a new controller
Unbox it, read the MAC off the label on the side, and write it down before the module goes in the panel where you cannot see it. Install the firmware, then set the addresses, then click Disable BOOTP/DHCP and confirm it took by cycling power and checking the controller is still where you left it. Then go round the panel and read every rotary switch on every adapter and drive, and put those numbers in the drawing. If something still will not answer after that, the next thing to check is whether the switch between you and it is forwarding your traffic at all — the switch and port basics cover more of that than the controller manual does, and the BOOTP tool walkthrough and the Studio 5000 route to the same setting are both worth having open alongside.