The FORCE indicator on a 1756-L83E has three states, and only one of them means nobody left anything behind. Off says no tag holds a force value and forces are not enabled; flashing yellow says somebody installed a force, walked away, and the only reason the machine behaves is that forces happen to be disabled at the moment. So the short version of everything below. ControlLogix forces have two independent halves, the value installed on the tag and the enable that sits at controller level, and both have to go before you can say the program is running as written. Disabling forces clears the effect and leaves the loaded gun in place. Removing them empties it. There is a menu item for each, they sit one line apart, and the difference decides whether the next person who enables forces gets a surprise.
Written against Studio 5000 Logix Designer v36 on a 1756-L83E. The behaviour below comes out of 1756-PM004 and the 5580 controller manual, and where I could not find a statement in a Rockwell publication I have said so instead of filling the gap.
What a force actually overrides
A force replaces the data your logic uses or produces. Not the wire, not the field device, not the module’s electrical state: the value in the tag, at the point where logic reads it or the output image is built. 1756-PM004 names three reasons to install one. Testing and debugging logic, checking the wiring to an output device, and keeping a process running temporarily when an input device has failed. The same manual is blunt about the third, and the wording is worth quoting to whoever asks you to leave it in — forces are a temporary measure and are not intended to be a permanent part of the application.
You can force all I/O data on a Logix controller except the configuration data.
On a structure or an array, which is what every I/O tag is, you force an individual BOOL, SINT, INT, DINT or REAL member. On an integer you can force the whole value through a force mask or you can force individual bits, and each bit carries its own status of no force, force on, or force off. A produced tag that is also marked Constant cannot be forced at all, and a produced tag that is forced cannot be marked Constant. Two side effects get forgotten. Forcing increases logic execution time, and the more values you force the longer the scan takes, so a commissioning session with forty forces installed is not measuring the scan time the machine will run at. And a force on an input does not travel. Forcing an input or a consumed tag overrides the value regardless of what the device or the producing controller sends, but it does not change the value other controllers monitoring that input receive. An output is the opposite: force one, and a controller listening to that module in a listen-only capacity sees the forced value too.
That asymmetry catches people who force an input to test a second controller’s logic.
Installing and enabling are two separate acts
This is the half of the subject that generates the phone call at 2am.
Installing a force means right-clicking a tag while monitoring it and choosing Force On, Force Off, or typing a value into the force mask. That puts a force value on the tag and does nothing else. Enabling forces is a controller-level switch, and 1756-PM004 is explicit that you only enable and disable at the controller level — there is no per-module enable. There are two of these switches, one for I/O forces and one for SFC forces, and you can turn them on separately or together. The menu path is Logic > I/O Forcing > Enable All I/O Forces, and the application asks you to confirm. Then the consequence people miss: once forces are enabled, any force you install next takes effect immediately. No second confirmation, no enable step, nothing between the right-click and the output changing state. That warning appears three times in six pages of the manual, which is a fair measure of how often it goes wrong.
The Online toolbar reports the two halves separately for each force type, and its four states read better as two questions than as four answers. Enabled or Disabled answers “is the override in effect”. Installed or None Installed answers “does anything exist to be overridden”. A project can sit at Disabled and Installed for years.
Reading the status before you connect anything
You do not need a laptop to answer the first question.
| FORCE indicator | What it means |
|---|---|
| Off | No tags contain I/O force values, and I/O forces are not enabled |
| Flashing yellow | I/O forces exist in the application but are not active, because forces are not enabled |
| Steady yellow | I/O forces are enabled; if any force values exist, they are active |
Read it from the aisle, before the laptop bag is open.
That table is from the 5580 controller manual, and the CompactLogix 5380 manual prints the same three states for its own indicator. Off is a genuine all-clear for I/O forces. Steady yellow on a machine that is supposed to be in normal production is a reason to stop and find out what is being overridden before you touch anything, because any change you make to a force value in that state takes effect the instant you make it. One limit on the indicator is stated in the manual and easy to forget: it shows the status of I/O forces only, and SFC forces never appear on it. If the program has sequential function chart routines, an indicator that is off tells you nothing about SFC forces, and the Online toolbar is the only place those show.
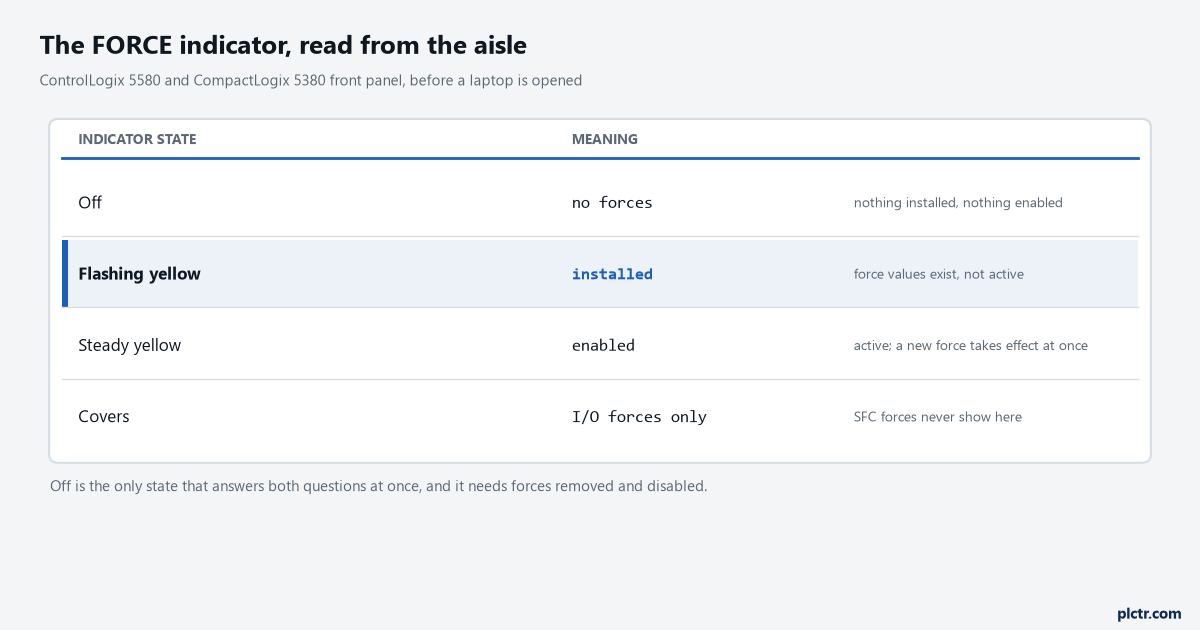
Off is the only state that answers both questions at once. Flashing yellow is the state that gets machines running on a force nobody remembers installing, because it looks harmless right up until the next person enables forces.
Getting the answer into your own logic
A GSV instruction reads force status into a DINT, and the two bits you want are the two questions above.
GSV(FORCE, , ForceStatus, Force_Status)

XIC(Force_Status.0)  OTE(HMI_Forces_Installed)
XIC(Force_Status.1)  OTE(HMI_Forces_Enabled)
Bit 0 set means forces are installed, clear means none are. Bit 1 set means forces are enabled, clear means disabled. Like the front-panel indicator, the ForceStatus attribute covers I/O forces only, not SFC forces. Two lines of ladder and a banner on the HMI home screen is the cheapest control there is over this entire problem. An operator who can see FORCES ACTIVE in red from the panel does not need to know what a force is to ring somebody about it, and a night-shift electrician who inherits a machine behaving strangely has one place to look first.

One rung per bit, sitting under the GSV. Both indicator tags clear is the state you want handed over at the end of a commissioning job, and it is the state the front panel calls Off.
ControlLogix forces: remove, disable, and the trap between them
Three commands, and the wording matters:
- Remove Force on one tag, reached by right-clicking the tag or element that carries it. This takes that one force out of the project.
- Disable All I/O Forces, from Logic > I/O Forcing. The forces stay in the project and stop overriding anything.
- Remove All I/O Forces, one line below it. The forces leave the project.
The trap is in the first one, and 1756-PM004 flags it with its own attention notice: if you remove an individual force, forces remain in the enabled state, and any new force takes effect immediately. So the electrician who removes the one force he installed, satisfied that he has tidied up after himself, has left the controller in exactly the state where the next force anybody installs goes live with no warning at all.
Then the dead end that costs more time than anything else on this page.
People look at the rung, see no force indicator beside the tag in that routine, and conclude there is no force. The force can be installed on a different tag that shares the same data, which brings us to aliases.
Why an alias makes a force hard to find
Two names, one bit, and only one of them appears in the routine you are staring at.
An alias tag and its base tag share one value in one place. That is the whole definition, and it has a consequence for forces written plainly in 1756-PM004: forcing an alias tag also forces the associated base tag, and removing a force from an alias tag removes it from the base tag. Read that from the other direction, which is the direction you are standing in when you are hunting. Local:2:I.Data.3 reading high while the field device is dead may have been forced through drill_1_depth_limit, an alias somebody created three years ago in a program you have never opened. Force either name and the other one carries it.
There is a command for this. Select the alias in the Tag Editor, then Search > Go To, and choose Base Tag in the Go to what list. It is the same command 1756-PM004 recommends for finding a base tag among the cross-reference records, and it is the fastest route from a friendly name to the address that actually landed on the card.
Forces on a GuardLogix, and the word “removed”
On a GuardLogix, the software finally does this checking for you, and only once.
The distinction between disabled and removed stops being a matter of discipline here and becomes a rule. All data in an I/O, produced or consumed safety tag can be forced while the project is safety-unlocked and no safety signature exists, CONNECTION_STATUS included. Then 1756-RM012 says this, and the emphasis is Rockwell’s: forces must be removed, not just disabled, on all safety tags before the safety project can be safety-locked or a safety signature can be generated. You cannot force safety tags at all while the project is safety-locked or a safety signature exists. Standard tags are untouched by any of that — you can install and remove forces on standard tags regardless of the safety-locked state. So on a GuardLogix a leftover safety force announces itself, because the signature will not generate while it is there. On a standard ControlLogix nothing stops you, and the only thing between a commissioning force and a machine that has run on it for two years is whether somebody looked.
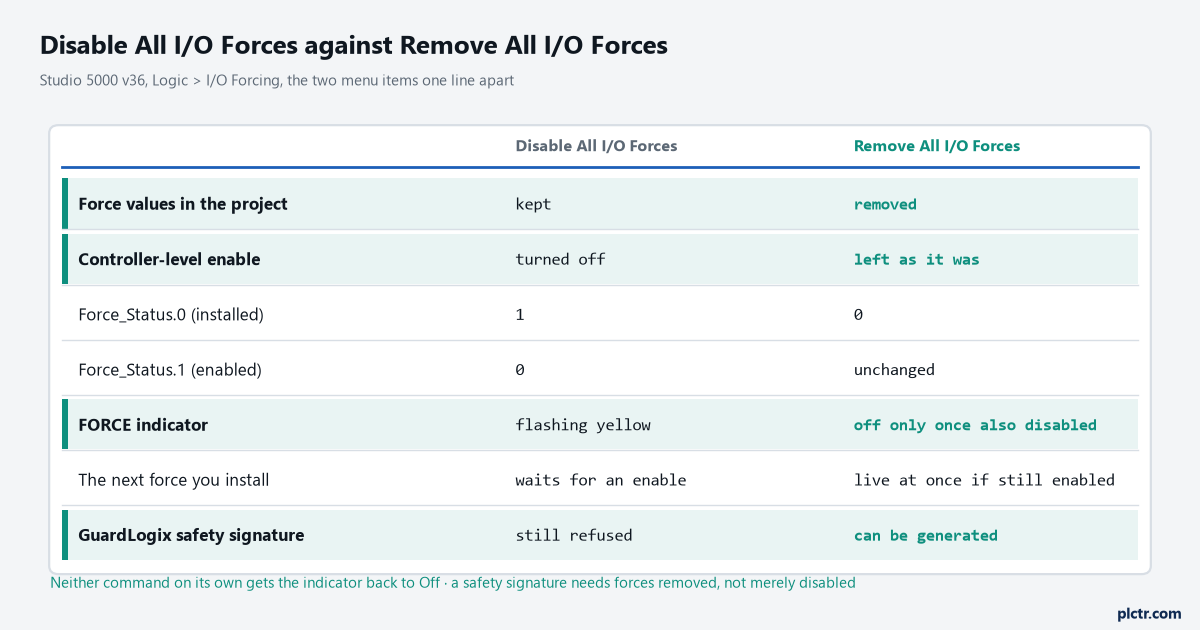
The two commands sit one line apart on the same menu and neither one on its own gets the indicator back to Off. Only the right-hand column lets a GuardLogix safety signature be generated.
What a download does to a force you forgot about
Forces outlive the session that installed them, which is the whole of this section.
They live in the controller, not in the laptop. 1756-PM004 states it directly: I/O forces are held by the controller and not by the programming workstation, and forces remain even if the workstation is disconnected. Closing Studio 5000 and driving home does not end a force. They also survive the round trip through a project file, because when you download a project that has forces enabled the application prompts you to enable or disable forces after the download completes. That prompt is the last chance anybody gets, and it appears in the middle of a download, which is exactly when people click through dialogs without reading them.
One thing I will not tell you, because I could not find it stated in any Rockwell publication I checked: what happens to installed force values across a power cycle of the controller. The manuals say where forces are held and what a download does with them, and they stop there. Read the FORCE indicator when the controller comes back up rather than assuming either answer.
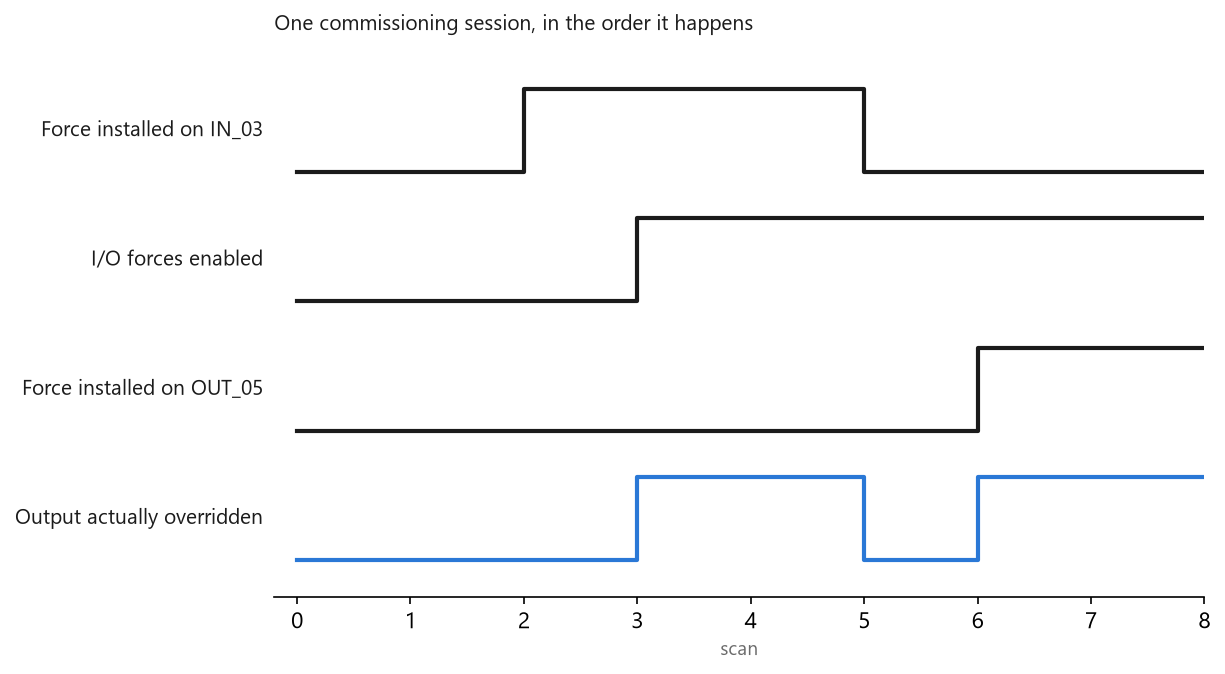
The force removed at scan 5 did nothing to the enable, so the force installed at scan 6 overrides an output the instant it is typed. Nothing asks you to confirm it and nothing on the front panel changes state.
The discipline that stops a force outliving the shift
None of this needs a procedure document, and three of the four items cost nothing.
What it needs is to be written down somewhere other than one person’s memory. Four things that work, in rough order of how much they buy you:
- Write the force on the machine, physically. A laminated card in the panel door with tag, value, date and name. The version that has never failed me is a strip of yellow tape over the keyswitch with the tag name on it, because the next person cannot change controller mode without reading it.
- Put the GSV rung above in every project you build. Two rungs and an HMI banner, before anybody needs it.
- End every commissioning session with Remove All I/O Forces and then Disable All I/O Forces, and check the front-panel indicator is off. Off is the only state that reports both halves at once, and neither command on its own gets you there: Remove empties the project and leaves the enable where it was, Disable turns the enable off and leaves the values where they were.
- On a GuardLogix, generate the safety signature at the end of the job. It will refuse while a safety force is still installed, which is the only automatic check any of this has.
The one that gets skipped is the first, and it is the one that matters when the person who installed the force is not the person standing at the panel six weeks later.
Next
Walk to the controller and read the FORCE indicator before you open a laptop. It is the cheapest check here and the one people skip.
If it is flashing or steady, get the GSV bits or the Online toolbar up before you change anything. If the machine is misbehaving and the indicator is off you are looking at logic instead, and rung-by-rung ControlLogix troubleshooting is the next stop, because a second rung writing the same output produces very similar symptoms to a force and shows nothing at all on the front panel. For anything that latched while you were forcing, the minor fault codes will tell you what the controller logged, the Watch Window will hold the tags you want to keep an eye on while you work, and the tag editor is where the alias column lives if you are chasing a force through a friendly name.