Adding an S7-1214C starts at the label: the CPU on the bench has 6ES7214-1AG40-0XB0 printed on the front, and the Add new device list in TIA Portal V18 offers three different CPU 1214C entries under that name, each with its own stack of firmware versions. Pick the wrong one and nothing complains: the project compiles clean, the hardware configuration looks right, and the trouble arrives later, at the download, as a dialog most people click through without reading.
So read the front of the CPU first. The article number is the whole answer to which entry you pick, and the firmware version underneath it is the whole answer to whether the load will go through.
Everything else you can change afterwards.
This was written against STEP 7 Professional V18, article number 6ES7822-1AA08-0YA5, which is the version the S7-1200 system manual A5E02486680-AP is issued for. Dialog layouts move between TIA Portal versions; the fields and what they decide do not.
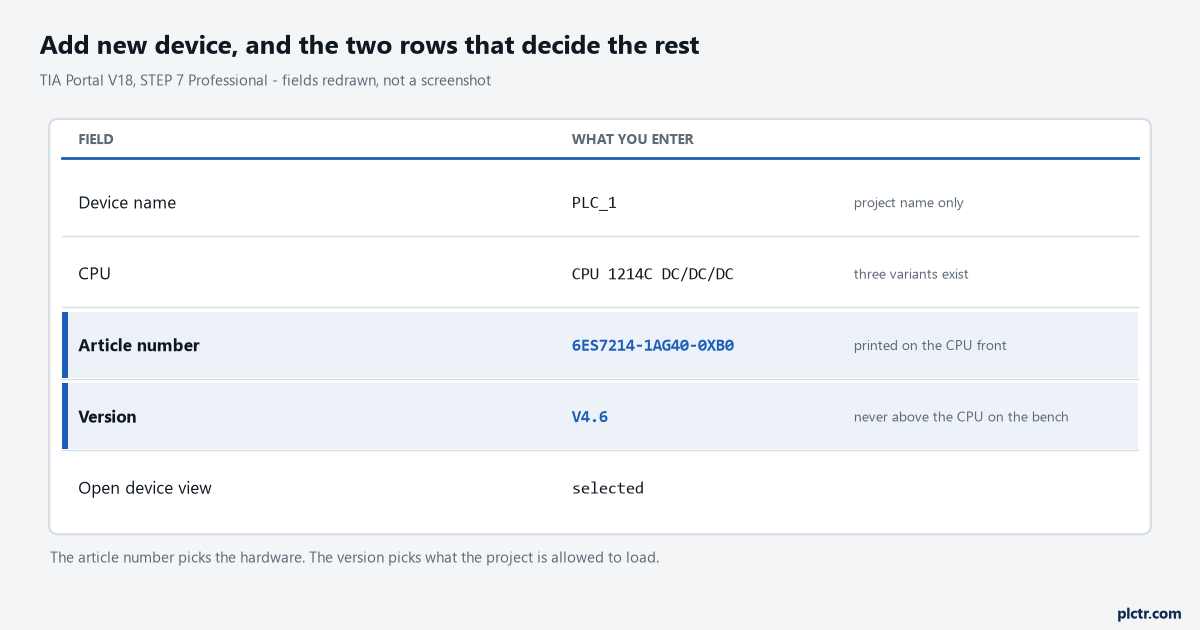
Our own drawing of the fields, not a screenshot. Device name here is a project label; it is not the PROFINET device name, which is a separate thing set later.
Adding an S7-1214C: the three of them, and telling them apart
A CPU 1214C is not one part. The S7-1200 system manual lists three in appendix A.6, and they differ in supply and in output type:
| Article number | Variant |
|---|---|
| 6ES7214-1BG40-0XB0 | AC/DC/Relay |
| 6ES7214-1HG40-0XB0 | DC/DC/Relay |
| 6ES7214-1AG40-0XB0 | DC/DC/DC |
All three are 110 x 100 x 75 mm, all three carry 150 Kbytes of work memory, and all three deliver 1600 mA max on the SM and CM bus and 400 mA max of 24 V DC sensor power. What separates them is the bit you care about at the terminal: whether the supply is line voltage or 24 V, and whether the outputs are dry relay contacts or transistors. Shipping weight tracks it if you are ever guessing blind, 475 g for the AC/DC/Relay against 415 for the DC/DC/DC, but that is a last resort and the printed number is right there on the front. Get this one wrong and the download does not save you: the manual is explicit that a load from a CPU 1211C DC/DC/Relay to a CPU 1211C DC/DC/DC is prohibited outright, because the I/O differs.
Relay against transistor is hardware, not preference.
The firmware version, which is where the real trap is
Under each article number the catalogue offers a version list. That version is not decoration. It tells STEP 7 what instruction set, what device parameters and what security features it is allowed to put in the project, and at download time it gets compared against what is actually sitting in the CPU. Two things happen, and which one you get depends on which way the mismatch runs. If the CPU on the bench is newer than the version you picked, the load generally goes through and you get a warning in the Load preview dialog: “Differences between configured and target modules (online)”, with the article numbers and firmware versions listed next to each other. You then choose No action, which cancels, or Accept all, which proceeds. Most people hit Accept all without reading the numbers.
If the CPU is older than the version you picked, it stops.
The manual names this case directly: you cannot download a project configured for a CPU 1214C V4.6 into a CPU 1214C V4.5.x or earlier, because firmware compatibility does not run downwards. Same part number on both sides, same terminals, same everything, and the Load preview comes back as an error rather than a warning.
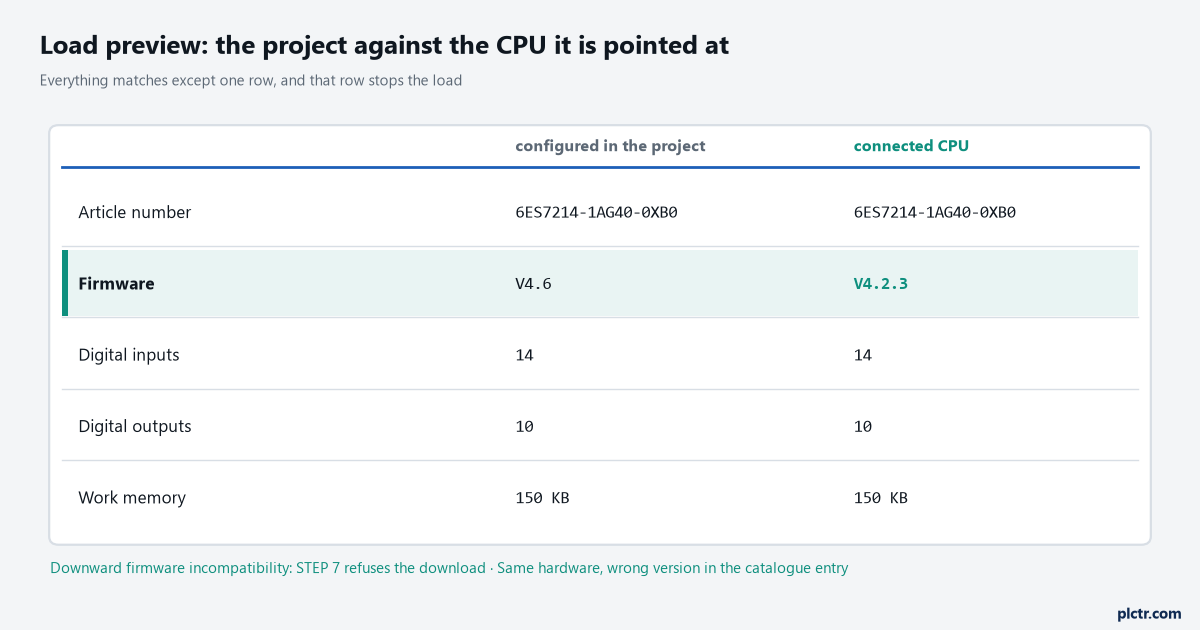
Every row matches except the firmware, and that single row is enough to turn a load into an error. The fix is in the project, not in the CPU.
The dead end here is worth naming, because it costs people an afternoon. When the load is refused, the instinct is to flash the CPU up to match the project. You can do that, from Online & diagnostics, Functions, Firmware update, with an update file you have downloaded beforehand. But it is the long way round and it is not reversible in five minutes. Changing the project down to the firmware you actually have takes about thirty seconds through Change device in the device configuration, and the Change device dialog gives you the full compatibility detail before you commit to it. Flash the CPU when you need a feature that only the newer firmware has. Do not flash it just to make a catalogue entry happy. The full walk through the mismatch dialog and both directions of fix is a page of its own.
One more failure that looks like a firmware problem and is not: the version you want is simply not in the list. That is a hardware support package question rather than a firmware one, and the answer is installing the HSP so the device appears in the catalogue at all.
When the label is unreadable, let the CPU tell you
Panels are dirty and labels fade. If you cannot read the article number, or you are working on a machine nobody documented, do not guess at the catalogue.
Create the project and pick the unspecified CPU instead of a specific one. Then, with the CPU connected, run Hardware detection from the Online menu, or take the detect option in the device configuration editor. STEP 7 uploads the hardware configuration from the CPU, including any SM, SB or CM sitting on it, and fills in the station for you, and from there you configure parameters the way you would have done if you had typed the article number in yourself. The heavier version of the same move is Update accessible devices in the project tree, select the PLC, then Online, Upload device as new station (hardware and software), which brings the program blocks across as well as the hardware and leaves you with a station you can compile. Which of the two you want depends entirely on whether you are documenting a machine that already works or starting fresh on a CPU you happen to have on the desk.
The PROFINET interface, and the address it does not have yet
Click the green PROFINET box on the CPU in Device view and the inspector window shows the interface properties. Ethernet addresses is the page you want.
A factory S7-1200 arrives with no IP address at all.
It has a MAC address, loaded permanently at the factory and unchangeable, printed on the front lower-left corner of the CPU under the lower door. Everything else you assign.
Two routes, and they do different jobs:
- Set the IP in the project, on the Ethernet addresses page, and it goes into the CPU when you download the configuration.
- Set it online first, through Online access, Update accessible devices, then Online & diagnostics on the device, Functions, Assign IP address. This is the one you use on an initial commissioning, before the project exists in any useful form.
Whichever you use, the programming device and the CPU have to end up on the same subnet for STEP 7 to find and talk to the CPU. A mask of 255.255.255.0 on both sides and a shared first three octets is the ordinary small-network answer: CPU on 192.168.0.1, laptop on 192.168.0.200, gateway blank. Different subnets need a router in between, and on a bench there is no router.
Add the CPU to a subnet in the project while you are here.
The Ethernet addresses page has the button for it, and until the interface sits on a named subnet the download dialog has nothing to aim at.
What the device name is, and why it is not the IP address
This is the piece that confuses people who came from another platform, so take it slowly.
The name in the Add new device dialog, PLC_1 by default, is a label inside your project. Rename it to Filler_Line_CPU and nothing on the network changes, because nothing on the network ever knew about it. The PROFINET device name is a different object entirely. It lives on the Ethernet addresses page, it is written into the device’s own configuration memory rather than into your project file, and it is how PROFINET identifies a station before IP has anything to do with it. Discovery runs on DCP, the Discovery and Configuration Protocol, which the S7-1200 manual lists as a link-layer protocol on Ethertype 0x8892 using the multicast MAC address 01-0E-CF-xx-xx-xx. No IP, no port number, no routing, nothing that a subnet mask has any opinion about. That is why Accessible devices can show you a CPU that has never been given an address, and it is why the flash-LED test works on a device you cannot yet download to.
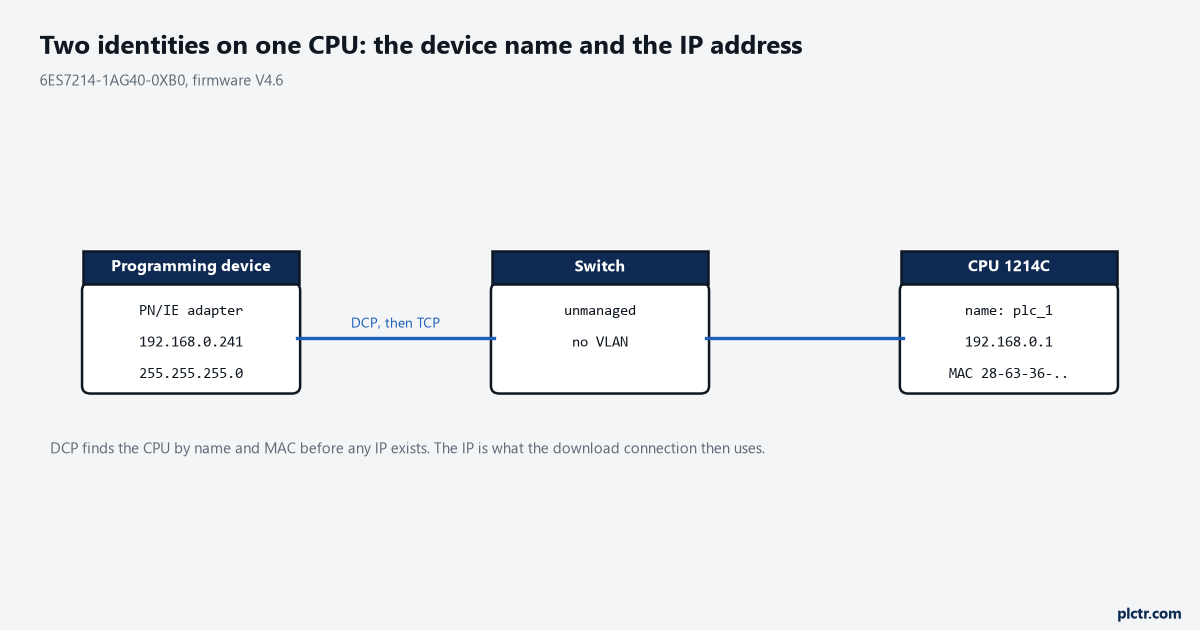
The name and the address are two different identities on the same port. DCP uses one, the download connection uses the other.
For an IO device on the CPU’s PROFINET network the name has teeth. The manual puts it plainly: the name must be assigned in the STEP 7 project and in the device’s own configuration memory, and if it is missing or the two do not match, PROFINET IO data exchange will not run. Not run slowly, not run with errors. Not run. You assign it from Devices & networks, right-click the IO device, Online & diagnostics, Functions, Assign PROFINET device name, Update list, pick the device, Assign name.
For the CPU itself on a bench with nothing else on the wire, the name matters less and you will probably never touch it. Note that it exists anyway, because the first time you add an ET 200SP or a drive to that network it stops being optional.
Before you press download
Four things are worth a look while the project is still empty and cheap to change.
- Startup after POWER ON, under the CPU properties. No restart means stay in STOP; the other two are warm restart into RUN, and warm restart into whatever mode it was in before the power went. A CPU meant to run without a laptop attached wants warm restart into RUN, and the manual says so in as many words.
- Comparison preset to actual configuration, on the same page, which decides whether a station whose real modules differ from the configured ones is allowed to start at all. Startup of the CPU only if compatible is the strict setting, and compatible has a definition: the module present matches the configured one in input and output count and in electrical and functional properties, and may be more capable but not less.
- Configuration time, default 60000 ms. That is the window the central and distributed I/O get to come up. The CPU goes to RUN as soon as they are ready regardless of the clock, and if they are not ready by the end of it the CPU goes to RUN without them.
- The security wizard, which launches by itself when you insert a V4.x S7-1200. Whatever you set there you will need again at download time.
Write the password down now rather than an hour later.
Next step is the load itself, and that is where most first sessions actually stall: the PG/PC interface dropdown, the empty accessible-devices list, and a CPU that downloads but will not leave STOP. If the project you are building has to keep its data block values through a later interface change, read what download without reinitialization does and does not preserve before you get into the habit of loading everything. And if you are new to the software rather than to the controller, the general shape of the TIA Portal workspace is worth ten minutes.